Saturday, November 18, 2017

French toast bake (FTB)

I get requests for this all the time! It's a great make ahead meal, especially for holidays and special occasions that you don't want to put a ton of work into the day of.

The way you build it really factors into your success of this dish, so make sure to read the instructions first. This is a prep the night before, and bake the next morning. I would recommend it not sitting in the refrigerator for more than 15 hours.

Ingredients:
¾ lb loaf of bread (we use texas toast which is just a thick cut white bread, it works best if the bread is not heavy or hard, brioche or white bread works well too)
¼ cup liquid margarine or melted butter/margarine
½ cup of half and half
½ cup of liquid eggs (you can use real eggs, but the liquid egg combines with the other liquid better)
Pinch of salt (no more than 1/8 tsp)
¼ tsp vanilla extract (you can use real or imitation, or even real vanilla bean and scrape the seeds from ½ a stick)
Cinnamon shaker
2 tbsp sugar, split in two
Fruit (optional)

How to:
The night before:
*Mix the half and half, liquid egg, salt and vanilla, split almost evenly into 2 containers, about 60/40 and set aside.
*Take a casserole dish or cake pan that is about 9”x9” and heavily coat the inside with your liquid margarine/butter. Some will absorb into the bread, and if there is only a light coat, you will end up needing to scrub the pan pretty hard. (I have also heard you can do this in a crock pot, but I am not sure how you'd go about that)
*Cut the bread into cubes no larger 1 inch squares and place half of it into the casserole dish and set the other half aside (either in a bag or bowl).
*Evenly spread out the bread and drizzle the smaller amount of the liquid over the bread in the pan, trying to get the tops of all the bread wet (not soaked)
*Sprinkle cinnamon evenly across the bread, depending on your taste. This is optional, especially if you are putting fruit in your bake, some won't pair well with cinnamon. Types of fruit you can try are banana, blueberries, strawberries or apple slices, any of these can be fresh or frozen. If putting fruit in your bake, would recommend a small layer at this point, with a sprinkling on top, so don’t put all your fruit in now.
*Sprinkle 1 tbsp of sugar evenly across the layer.
*Place remaining bread into pan, pressing down if it is a bit tall for your pan.
*Drizzle remaining liquid carefully over bread, making sure to get corners. It is helpful to turn the dish so you can see it at different angles in case you only got half of an area.
*Sprinkle cinnamon and then the other 1 tbsp of sugar evenly across pan.
*Tear a piece of foil that will cover the top of your pan, spray the foil with pan spray anywhere the bread will touch, and cover the pan tightly around edges. You don’t want the oven air exposed to it because you will end up drying it out into croutons.
*Place in refrigerator overnight.

The next morning:
*Bake at 350 degrees for about 30-40 minutes. It is near ready when you take a fork to the middle of it, and when you push some of the bread out of the way to see the bottom of the pan, you don’t see any wet bread.
*Remove the foil and let cook for another 5-10 minutes so the sugar can get a little crunchy on top.

*Take out of oven and enjoy! Can sprinkle with powdered sugar, fruit sauce, or syrup.

Monday, February 10, 2014

buttermilk pancakes

i've made over 25,000 pancakes in my life, and this is how i make them.

this recipe yields 16 4" pancakes, and usually people eat 2-3 (depending on how hungry you are). you can cut the recipe in half to accommodate smaller groups, or if you make a full batch, individually freeze the leftovers and they are great for a quick breakfast (just microwave until warm).

2 1/4 cups AP flour
1/4 cups whole wheat flour (or just add the 1/4 to AP if you don't have whole wheat flour)
2 tbsp brown sugar
1 tbsp granulated sugar
1 tsp baking powder
1/4 tsp salt
1/2 tsp baking soda (if you are not using buttermilk, do not put this ingredient in)
1/2 cup of melted butter or room temp oil
2 eggs
2 3/4 cup buttermilk

in a mixer, i put the buttermilk in the bottom, add the dry, and start to mix, then add eggs and melted butter or oil. you need to add the melted butter after starting to incorporate the dry and wet together, otherwise the butter may reach the milk and it will get cold and not mix with the batter well. if you are using a hand mixer, go in the same order.  either way, scrape the sides often.

just the right time to flip
perfect pancake
it's best to warm the pan before putting the batter on it. if you have one of those plug in griddles, use it, if not, buy one, they are fantastic. when the edges of the circle of batter start to dry and bubbles form in the middle of the pancake, it is ready to flip.  just like this first picture. you'll see that the pancake had perfect coloring and crispiness. let it cook on the other side for a short while, once the color is around the same.

pan is too hot
pan is not hot enough
how hot is your pan? if the batter appears to dry out but bubbles haven't formed, looks rubbery or seems hard to flip, your pan is not hot enough.  if you keep it on the pan for too long, it could get tough. if the edges form quickly but bubbles are small and mostly around the edges, your pan is too hot.  neither of these are inedible, they just may not result in the best pancake ever. if it doesn't have enough time on the pan, the middle may be gooey. you can see the kind of markings these situations result in with these pictures. if it is too hot you get instant coloring as the batter hits the pan (you'll most likely hear a sizzle). it doesn't get a chance to spread evenly and creates ridges that cook more than the other part of the surface. when the pan is too cool, it does have a chance for the entire surface to get to the heat source, but there isn't enough heat, so it is just pale.

fyi...
buttermilk is generally low in fat (unless you seek out a higher percentage) but gets a bad rap of being fatty, i think due its consistency. to make butter, you churn cream, in this process, the fat separates from the liquid in the cream. this left over liquid is still milk, so they called it buttermilk. since all the fat went and made the butter, it's not in the buttermilk. but this is not how the big business make it since they aren't our farming ancestors who utilized what they could of everything. they use cultured bacteria (like when they make yogurts) instead which still results in relatively the same product, just a bit thicker than traditional. its consistency comes from having a higher acidic content then regular milk, it basically curdles it, but not to the point it turns into cheese, and not in the bad way of forgetting about that milk in the back of the fridge. we add the baking soda when we use buttermilk because we need a fast acting leavening agent to produce those bubbles. if we didn't, we'd end up with some dense pancakes.

in conclusion, i highly recommend using buttermilk :)

if you like to create things - try making your own butter (and then you can use that buttermilk towards recipes like this), all you need is a mason jar, cream and some eager volunteers to shake it up like crazy.  if you don't want to work out your biceps, you can also make it in a stand mixer (if you've ever made whipped cream and walked away for too long, you end up making butter) or a blender (just make sure you hold the lid down for the entire time). with a stand mixer, you can start slow and speed it up when it starts to look like whipped cream, as soon as it starts to separate, you want to slow it down or the buttermilk will splash everywhere.  in a blender, as soon as it starts to separate, you want to stop the blender and let it sit for a few minutes (so the butter can rise). i've read to help your butter last longer, you rinse it.  to do this, after you drain the buttermilk from the container, add ice cold water to the butter and blend for about half a minute. drain the water from the container and use a large spoon or a rubber spatula to press the butter against the edges to get any remaining liquid out. use a tight sealing container to store it in (i like mason jars).  as far as the yield goes, you get about half butter and half buttermilk, so if you use 2 cups of cream, you end up with 1 cup of butter and 1 cup of buttermilk.

Tuesday, October 15, 2013

breakfast cookies

woah, it's been a while since I posted anything!  and look, it's not a condiment or side thing!

these things are yummy.  like ridiculously delicious.  they also have the most ingredients in all of my baked goods recipes.

1 egg
1/4 cup brown sugar
2 tsp vanilla extract
1 banana
1/4 cup yogurt (i like to use vanilla dannon natural)
1 1/2 tbsp honey
1/4 cup butter
1 cup AP flour
1/2 cup whole wheat flour
1 cup rolled oats
2 tbsp flax seeds (any kind, golden will hide well for those picky eaters, ground even more so)
1/4 tsp salt
1 tsp baking soda
1/4 tsp cinnamon
1/2 cup mini chocolate chips

mix from top of list to the bottom, i like mixing all the wet together to blend well before adding dry, and as always, when adding things that aren't incorporated into making the dough (chocolate chips), add very last after you have formed the dough.  you can scoop or roll out the dough and cut squares or circles.  it stays in the shape you make it.  the picture is a scoop that has been pressed down.  you can put them really close to each other on the greased pan as they do not spread.  i bake them at 350, and each batch takes its own time, so it's best to go off their coloring.  they get golden brown when done, if they start to turn a caramel or chocolate color, they will be dry.  instead of putting mini chocolate chips in it, you can always melt down chocolate chips and then drizzle the top, big chocolate chips are just too chunky for this cookie.  i can only imagine walnuts or pecans would make this even more heavenly.

for real, 2 of the cookies and you are set for hours.

Friday, August 17, 2012

buttermilk ranch

I used to use the hidden valley packets to make ranch at camp, it's simple, you mix even parts mayo and buttermilk and voila, ranch.  but this year, i had the diligence to actually create and refine my own recipe.  so here it goes:

8 oz mayo (there are some that have high fructose corn syrup, major reason why i wanted to make my own in the first place, so make sure you read ingredients if you want to make this to avoid some of those pesky ingredients)
1 tsp parsley flake (dried, crush with hands)
1/4 tsp dill (dried, crush with hands)
1/4 tsp ground pepper
1/4 tsp salt
1/4 tsp granulated onion (granulated spices have a different flavor than powdered, i think powdered tends to make things sweeter and granulated has that richer earthy flavor)
1/4 tsp granulated garlic

whisk ingredients together well (watch for pockets of seasonings)

whisk in 4-6 oz buttermilk (depending on how think/runny you prefer).

yeilds 12-14 oz

you can store it in an old jar or bottle you have, some places will sell squeeze bottles if you start investing in making your own condiments, buy these.

you can also use the seasonings and replace both the mayo and buttermilk with sour cream (12-14 oz) and make a ranch dip that is tasty for both veggies and chips.  i also use these seasonings when making potato wedges or roasted vegetables.  they are so good you won't want to dip them in anything.

Monday, October 10, 2011

the ultimate rct...

yet another secret recipe revealed...  

i called them RCT, because it's just easier to write down the three letters instead of the whole thing.

what you need:
12.5 oz crisp rice cereal (generic is fine, you can use the real stuff if you want)  this weight is equal to about 13.5 cups

20 oz of jet puff mini marshmallows (quality) - 1 bag is 16 oz

1/4 lb unsalted butter (1/2 cup) - i don't use margarine

a bowl large enough to mix everything (i use a metal one, it tends to not stick to the walls too much, but you can use glass or plastic).

a pot large enough to melt butter and marshmallows.

2 cookie sheets or casserole dishes to spread the treats into.

pan spray.

spray the bowl with pan spray and pour the cereal in the bowl.  put 4 oz of marshmallows in with the cereal and mix it all together so they aren't just sitting on the top.
melt the butter in the pot and slowly add the marshmallows until smooth and has a bit of a caramel color to it.
pour the marshmallow mixture over the cereal and slowly fold the cereal over until incorporated, like in the picture to the right.
once it is all stirred up, spray the dish it will set in and pour it in.  spray your hands with pan spray so you can pat down the treats without it sticking to you.  the 2nd dish is just in case you need to split it into another to spread it out.
i usually get about 40 treats that are 2"x2", but cut up into the size you like and enjoy!


Wednesday, September 14, 2011

salsa

sorry i didn't hold up to my promise, summer got crazy and my brain is starting to comprehend these things.  and i just spent forever creating a new blog and it just froze up on me!  so this isn't as detailed as what i had before, but i'll try...

salsa, the fresca style


what you will need:
5 medium tomatoes
1 small yellow or white onion
0-3 serrano peppers (i like to use these because it adds heat without a major flavor, but if you have a favorite pepper, feel free to use it)
handful of cilantro (the pre-bunched amount they sell at the store should be perfect)
2 cloves of garlic (or 1 tbsp of the jarred chopped garlic in water)
2-3 limes

there are two ways to prepare this salsa, chunky fesca style or a blended smooth salsa.  to blend it, you'll want to use a blender or food processor, a standard submersion blender won't have the power to break up the chunks.  when chopping everything, you'll want to use a chef's knife (like the one in my photos).

handling the peppers: buy a packet of vinyl gloves at the store (i've bought them from target and albertson's and i'm sure any other grocery store would have them).  cut the stem part of the pepper off and then slice the pepper in half long ways.  you can use your gloved thumb nail or spoon tip to remove the white interior and seeds of the pepper.  if blending the salsa, this is all you need to do to the pepper.  if preparing it fresca style, slice the pepper thinly long ways (julienne), then cut those slices into small pieces (this is a mince chop).  run the knife over the pile of peppers with a rocking motion to break it down a bit more than the mincing.

if blending the salsa and the entire amount doesn't fit in the blender, blend a mixture of the items together in stages and mix the entire amount in a bowl once complete.  you will want to blend the tomatoes, onions, garlic, peppers and cilantro in the blender.  chop the items down to smaller sizes to blend (mainly just the tomatoes and onion).  remove majority of stems from cilantro.  reserve the lime juice until the end, where you will blend the juice in gradually until you reach the taste you desire.

to prepare fresca style:
tomatoes - the easiest way that i have found to dice tomatoes is to slice the tomato as if you are making a sandwich, then dice the slices down one or two at a time.  do not overload your knife, tomatoes like to run away when you put too many on the board, so it ends up taking more time to cut down the massive pile as it does to pace yourself and cut smaller portions.
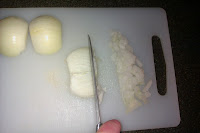
onions - i have pictures that show me cutting down an onion in the way that i have discovered works best for me.  i have never been good at the method you see on cooking shows, so i played around with it until i found what worked for me.  you start by cutting the top and bottom off and removing the outer skin.  place the onion on the cutting board with a flat side down and cut the side off so the middle remain like in the photos to the left.  set those pieces aside and cut the middle piece in half like the photo to the right.  those middle bits then get cut into 4 pieces so you can lay it down side by side, like on the left and slice it down into the small pieces for the salsa.  
cut down both middle pieces like this and then move on to the outside pieces.  slice the side pieces one way, then slice them down the other way to create the small pieces for the salsa.   


cilantro - remove majority of the stem (either trim the stems off while bunched, or remove all the leaves from the stems).  pile the cilantro on the cutting board and mince down the cilantro.  keep the tip edge of the knife on the board and rock your knife back and forth to cut the pile to pieces.  you can chop down as small or not as you like, this is a "as you like" aspect of the salsa.

garlic - if you are working with fresh garlic, one you remove the tips and skin, place the clove on the cutting board and place your knife over it, holding firmly in place with one hand.  with your other hand, palm down, fingers up, smack the knife, starting only from a few inches away.

 if you are uncomfortable with this method, you can use the bottom of a glass tumbler to reach the same result.  once the garlic is smashed, run over the garlic with your knife in a rocking motion like you did with the cilantro.

 once everything is chopped up, place in a bowl and stir until everything is evenly mixed, dress with the lime juice and gradually add pepper until desired taste is reached.

this will prepare enough for a party setting, or enough for someone who loves salsa on everything.  you can cut this recipe in half if you and save the half onion for another recipe and up the tomato to 3.

Sunday, June 5, 2011

roasted carrots

if you don't like cooked carrots, let me change your mind...

i cook these for adventure weekends and every single time i make these (and i am not kidding on this, literally, every time), i get at least one leader begging me for how i made them.  i don't like cooked vegetables (love them raw though), and i will eat these, and if you know me in the real world and have ever experienced my foodiness in person, then you know, this is serious.


what you need:
carrots
garlic powder
salt (i use kosher, the flake type)
coarse black pepper
oil (i use the 75/25 of canola/olive)

the pictures i am about to show you is about 20 lbs of carrots, so my dusting of spices is going to be much more than yours, but it is the same concept.

i was taught this "diamond" cut for carrots last year and i just recently really understood how to actually do it. but as long as you chunk the carrots into nice bite sized pieces, any which way is fine, but i am going to try to describe the way we do it.  it is pretty much creating a pencil point as you chop down the carrot.
you cut the small end of the carrot at an angle.  on the cutting board, place the carrot straight across.  imagine the top of the cutting board as north, your knife should cut the carrot as if was a line from NW to SE (or a 45 degree angle)
turn the carrot towards you so the flat oval you just created with that slice is facing up.  slice the carrot at the same angle, where the closest side of the oval will be sliced in the middle, like this ( \  )
when you turn the carrot towards you again, the oval is now going to be pointed, you want the arrow you've created to be pointing NE.  now that the oval doesn't exist and it is now a semi-oval, you pretty much have to imagine the full oval there and keep cutting like described above.
i know, it is complicated, it took me a long time to generally get it down.  but it is really easy once you actually get the flow of it and understand how to do it.

ok, the actual process...
p.s.  i don't peel the carrots.
chunk them, throw them in a bowl, but not too full you cannot stir them well (2-3 inches under rim depending on how many carrots you have).  pour a generous amount of oil on the carrots (excess just sits at bottom of bowl, and then ends up greasing the pan for you).  they should look glossy once you stir them.
dust the top with garlic powder like i have on the left there.  again, that bowl has about 20 lbs of carrots in it, is 2 feet wide and 5 inches deep, so that is my generous dusting to that large serving.  a good way to gage it is enough is if, once it is stirred and the powder has been absorbed into the oil, you can still smell garlic if you get close to the carrots (if you smell it without being near the bowl, it may be too much). with the salt, you want to do the same (right) get a good coat on the top, then stir.  with the coarse black pepper you want to watch it, if you add too much, it will be really spicy and if you are trying to get kids to eat these, then that won't do it.  you basically want the carrots to look freckled once you are done.

this is how they should look to head into the oven

pre-heat oven to 350 degrees

use a pan with an edge so the oil doesn't run over the sides.

no need for oil as it won't stick.  may want to line the pan with foil to make for easy clean up.

roast in oven for about an hour or until the core of the carrots starts to turn yellow and the edges turn brown and dark brown.